Grandmother's Colorwheel
| Fabric | Quantity | Cutting Instructions | Comments |
|---|
| White-on-White | 1 yard | Cut 24" x 24" square | For background. You may also consider using a Cream-on-Cream. |
| Multi-Colored Print or Hand Dye | 3/4 | Cut 2 strips @ 3.5" x 24"
Cut 2 strips @ 3.5" x 30"
Cut 4 strips @ 2.25" x WOF | For borders and binding. |
| Black or Black Print | 1 - 6" square piece | Cut into circle using Template A & Template B | You may select another color if you prefer. |
| Muslin | 1/8 yard | Cut 4" x 29" | Fold the short sides in 1/4", press, and repeat.
Fold in half, lengthwise, with folded ends facing in. Press with iron. (For hanging sleeve.) |
| Misc. Materials | 1 yard batting and backing of your choice, and matching thread. |
|---|
| 24 Step Hand Dyes for Colorwheel |
24 - 2 5/8" x 7" rectangles of graduated colors to match the colorwheel. Great time to go through those scraps, and work on your color theory as well. |
|---|
Templates
Be sure to print the
templates page before you begin. Refer to the printed dimensions of
the fan wedge to ensure that your printer settings match the template settings. You may need to go into your advanced printer settings. I use "center on page" and at "scale = 100%" on my Canon printer to get the right dimensions.
Step 1 - Cutting The Wedges
Using the 2 5/8" x 7" strips from the Hand Dye Packet, align the Fan Template on top of a stack of 6 strips, and cut the
sides off. (Use caution going forward as the edges are on the bias.) If you are having trouble keeping the wedges aligned,
use fine silk pins to hold all layers together, or cut fewer wedges at one time.
Step 2 - Sew The Wedges
- Fold each wedge in half, lengthwise, right sides together.
- Finger crease the top half of the wedge.
- Using a 1/4" seam allowance, stitch across the top portion of the wedge, beginning at the raw edge and sewing towards
the folded edge.
- Use chain piecing to speed up the task.
- Press the seam to set it, then clip off the corner of the wedge near the folded corner.

- Press the seams open, use your fingers, turn the wedge tip right-side out (use a boning tool or other device to
get the very tip pointed out), and then align the seam line with the crease you previously made.
(This will ensure that your wedges are all symmetrical.) Press the wedge flat using your iron.

- On a large surface, lay the wedges out in proper color order, right side up. (Please note, my wedges are off a bit,
align the yellows so that they are in the correct gradation order.)

- Starting at the most red, pair the wedges in twos, in correct order. (You may wish to number them using a pencil on
the back side of the wedge as it will be the "wrong" side and not show through.)
- Starting at the top of the wedges (see the arrow in the 2nd picture), and using a 1/4" seam allowance, sew the pairs together. Remeber to chain stitch to
save time.
- Press all seams open.
- Continue steps 7, 8, 9, & 10 until all of the wedges have been sewn together. It is important to lay them out in order
after each pair have been sewn to preserve the colorwheel order.
Step 3 - Applique the Colorwheel to the Background
- Fold the background square in half and finger press to create a crease. Fold in half again and finger press a crease
in the other direction.
- Repeat the above for the colorwheel, making the fold so that the red is on the top-right side of the vertical fold.
- Place the colorwheel circle on the background fabric, aligning the fold marks together for centering.
- Using fine pins (I like the small applique or silk pins), pin down each wedge at the top and bottom. Put the
pins in the seam allowances of each wedge pair, one at the top, one at the bottom.
- Using a fine thread, a 60 weight in a neutral color, hand applique the wedges to the background fabric. (If you are
lucky like me, you might have enough color variety in your thread stash to coordinate each wedge section.)
- Using a small running stitch, baste the inside circle of the colorwheel to the background fabric about 1/8" inside
the raw edges. (This will be covered by the circle.)
- If you prefer, you may machine applique the colorwheel down using a small zig-zag or blind hem stitch, and monofilament
thread.
Step 4 - Attach the Center Circle
- Fold your 6" black square in half twice.
- Aligning the edges of the template with the folded edges of the black square, pin Template A to the square, and trim the
excess fabric away.

- Using Template B, cut a circle using either cardstock, or template plastic.
- Using a hand running stitch, sew around the circle, wrong side facing you, within 1/8" of the raw edge. Leave a long
tail of thread, about 8". Do not backstitch.

- Pin (or staple), the round template to the center of the circle, ensuring it is within the basting stitches all
around.
- Holding the center of the circle, pull the thread firmly so that the fabric begins to fold over the template.

- When you have folded it as much as you can, knot off the thread, or backstitch, and press the circle well, with the right
side facing up. (If you are using template plastic, be sure to use a press cloth.)
- Fold the circle in half twice, and use the fold creases to center the circle over the raw opening of the colorwheel.
- Hand or machine applique the circle down.
Step 5 - Add the Borders
- Add the two side borders first.
- Press seams towards the border.
- Add the top and bottom borders, and again press seams towards the border.
- If you wish to hand quilt, you may desire to trim away the excess background fabric on the wrong side of the quilt.
Finishing Touches
Sandwich, baste, and quilt the quilt as you desire. Don't forget to attach your hanging sleeve! I would recommend stitch in
the ditch with a neutral thread between each wedge, outline stitch on the background fabric repeatedly, about 1/8" apart, to
set the colorwheel "ontop" of the rest. Then, using a primary colored thread, or perle cotton, quilt concentric circles
inside the black center circle.
Closing Thoughts
This is a great quilt to test and learn your colors. Hang it on the wall in your sewing room and you will never be at a loss
in regard to color theory. Please refer to my Color Theory tutorial at
http://www.quiltpox.com/dyeing/oncolor.html to brush up your skills.
Consider making your own colorwheel using scraps from your basket. Small scale prints will work best. This would be a
great exercise in color theory. Feel free to use the pattern to teach color theory to your guild, or class room.
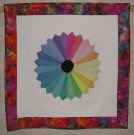
Here is my completed version:

