Making the Red/Blue Half Square Triangles (HSTs)
We will make the red/blue HSTs:
Following the same instructions for making HSTs and the 6 3.5" red squares, and the 6 3.5" squares, create 12 red/blue HSTs. Trim these to 3" squares.
You should now have 12 red/blue HSTs that look like this:

Making the 9patch/HST units
Following the grid below, join the red/blue HSTs with the white/red/blue 3" squares. Presse the seam allowances towards the center row. You will need 4 of these units:
| Row 1 |
 |
+ |
 |
+ |
|
| Row 2 |
|
+ |
|
+ |
|
| Row 3 |
|
+ |
|
+ |
 |
Your completed square:

Unfinished Size: 8" x 8"
Assembling the Quilt Top
| Row 1 |
 |
+ |

|
+ |
|
| Row 2 |
 |
+ |
|
+ |
 |
| Row 3 |
|
+ |
 |
+ |
|
Your completed top (sans borders):
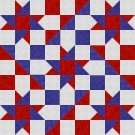
Unfinished Size: 23" x 23"
Adding Borders, Quilting, Binding
Now you are ready to add the borders. If you need instructions for measuring and adding borders, quilting, and binding, continue onto Page 3. Otherwise:
- Add the two 2.5" x 23" red borders to each side. (Remember to measure through the center of the quilt horizontally and vertically so that your sizes are correct. If not, adjust as necessary.)
- Add the two 2.5" x 27" red borders to the top and bottom.
- Add the two 3.5" x 27" blue borders to each side.
- Add the two 3.5" x 33" blue borders to the top and bottom.
- Using the 4 - 3" strips of red fabric, piece your binding. The quantity assumes that you will be using the Double French Fold Binding method.
- Sandwich the quilt top, batting, and the backing (a 35" x 35" piece of white muslin). This is such a small project that basting spray should be enough with a small safety pin in each square.
- Quilt the top as desired. Suggestions:
- Stitch in ditch around each star
- Stich in the ditch around each star square border
- Stitch in the ditch diagonally following the blue "lines" formed by the HSTs in the 9Patch blocks, forming and accentuating the friendship star that serves as a backdrop
- Stitch in the ditch around the remaining portion of the 9patch blocks.
- Borders: either do a free motion meandering stitch, or accentuate the geometry by quilting diagonal rows of diamonds. If you want to be really creative, draw and quilt smaller stars randomly across each border using silver metallic thread.
- Square up the quilt if necessary.
- Add the binding, use the remaining muslin for the sleeve.
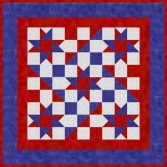
Your quilt should look like the picture at the top. Consider making another wallhanging in red, gold, and green for a stunning Christmas time wallhanging.
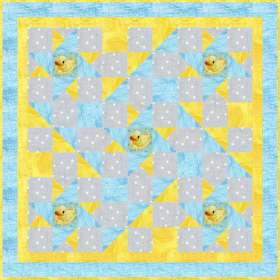
Here are two more possible layouts, using a rubber duckie print (great baby quilt) and a celestial print, fussy cut in the centers. Notice how varying the layout of the color in the 9patch blocks changes the importance of the background friendship star.

Go Back to QuiltPox.com
|