Bias Binding Tutorial
This is a quick and easy method of making continuous bias binding. Bias binding, that is, binding that is created using strips cut on the bias of the fabric, is useful for doing irregular shaped projects, curved edge quilts, and the like. There is a quick and easy method for creating one, long, strip of bias binding without having to cut many strips, sew them together, press and trim, as you do with straight grain bindings.
The first thing you will need to do is determine how large of a square that you need to cut. Use the Bias Binding Calculator to determine the square size. This calculator assumes a 40" Width of Fabric and included an additional 15" for turning corners and fudge room.
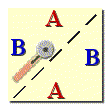
Using a pencil, mark an A on both vertical sides and a B on both horizontal lines. Next, align your ruler from diagonal corner to diagonal corner, draw a line, and then cut on that line to form two bias right square triangles:

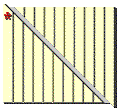
Match up the B sides of the triangles, right sides facing, and sew a 1/4" seam allowance. (You should have an approximate 1/4" dog ear extending on both sides.) Press seams open. Measure and mark with lines equal to the width of your bias strip. Next, bring the A sides together forming a tube. Offset the width by 1 line marking. Sew a 1/4" seam allowance. Press seams open. Now, starting at the offset end, (marked with a red * in the diagram), using scissors, cut the binding following the lines drawn on the tube. Press the binding strip in half lengthwise, and it is ready to be attached.

Note: This diagram is incorrect. The drawn lines should be parrallel to the long edge, ie, the opposite way that they are shown. I will replace this diagram when I have a chance.


Page last modified:
All graphics and content ?2004 QuiltPox.com & Kimberly Crapsey, unless otherwise noted. See full copyright notice.